Independent Stampin Up! Demonstrator since 2007
Welcome to my little ole' stamping blog! I'm so glad that you stopped by! I have lots of creative things to share with you with the occasional life post thrown in! Come on in, relax and stay awhile! :)

Saturday, March 31, 2012

Bigger baskets hold more chocolate!

  Happy weekend to you!  So, I had a lot of questions about the basket I made in this post and since I had so much fun making the first one I thought I would make another one...a bigger one!  You can make these baskets from a 6x6, 9x9 or 12x12 square.  The basket from my first post was 6x6 and today's basket is from a 9x9.  It feels pretty sturdy to me and would certainly hold a couple of handfuls of chocolate! :)
                                  Take a look:

I really, really like this size!  The smaller one is adorable, but this one just seems more practical (or able to hold more chocolate...I get those two confused! :)  


Handles fold down for easy stuffing!

Lots of room in there!

Flowers are cut from the Daisies Big Shot die and the butterfly is from the Beautiful Wings embosslit.  I added  some pearls to dress her up some!

Side by side comparison of the 6x6 and the 9x9. 

View from the top!

Details:
Paper: More Mustard, Very Vanilla, Always Artichoke and Pacific Point
Ink: Chocolate Chip
Punches and Dies: Daisies BS die, Corner Rounder, Scallop Ribbon punch and Beautiful Wings embosslit die
Extras: Pearls, Pop dots, large brads, 3/4" Circle punch and 1/2" Circle punch

If you haven't tried these little cuties yet I definitely  recommend it!  There is a great tutorial here on Rachel's blog the little blue room.  She is super talented so hang out a while and check out her blog!

Ok, I am off to enjoy the day!  Hope that you have a good one! :)


Friday, March 30, 2012

Field Flowers and Faux Silk!

   Happy Friday!  Wow!  This week seems to have just vanished into thin air!  Where does the time go?!  No complaints here though...weekend is here!  Bring it on! :)  Got any big, fun plans?

   I have a card to share with you today using one of my favorite techniques.  It is called faux silk and is so easy, but I just love the result! It also uses one of my all time favorite, favorite stamp sets ever!  Hmmmm...maybe I should have titled my post Favorite Faux Silk and Field Flowers Friday!  Now that is a mouthful!  In case you hadn't guessed it, this post is happening pre-coffee!  Ok, onto the goods:

The main image is done using the faux silk technique.  I stamped the flowers onto Very Vanilla and then covered the whole thing with a glue stick.  I took a plain ole piece of white tissue paper and crumbled it up into a tiny little ball.  I un-crumpled it and smoothed it out and adhered it to the image.  The trick to it is to get it all to stick without smoothing out too many of the wrinkles!  Once it is on good you flip it and trim off the excess and there you have it...faux silk!  It is really pretty in person!

Looks a little silkier here!   It also makes the image look softer.  You can stamp right on the tissue paper  if you prefer depending on the look you want.  Sometimes stamping on the tissue paper causes the ink to bleed and gives you a fuzzy image.

Butterfly is from the Kindness Matters stamp set.  He is all shimmer-y!

I bent the wings up to give him the illusion of flight!  Simple trick that adds some extra oooomph to the card.

Field flowers is a 2 Step stamp set.  I stamped the stems first in Always Artichoke and then stamped the flowers.  First you stamp the main flower image (I used Pretty in Pink) and then stamp right on top of it with the details stamp For that I used Melon Mambo, because it is a darker shade of pink).  It adds the lines and crevices to your image!  Fun, fun, fun stamping!!

Details:
Stamps: Kindness Matters
Ink: Pretty in Pink, Melon Mambo and Always Artichoke
Paper: Certainly Celery, Blushing Bride, Very Vanilla and DSP (retired)
Punches and Dies: Dotted Scallop Ribbon Border punch
Extras: Dazzling Details, Rhinestones, Pleated Blushing Bride ribbon

Ok, off to find that coffee and get my day rolling!  Hope that you have a wonderful day!  I will be back soonest with more to share!


Thursday, March 29, 2012

Baskets, baskets, baskets...I love, love, love them!

    Hello and happy Thursday! :)  It is an absolutely gorgeous day out today.......*sigh!*going to make staying inside to clean house a real chore.  On to more pleasant news though...I have another little basket to share with you!  I stumbled upon this little cutie while blurfing (blog surfing!) recently and couldn't wait to try it!  I actually saw it on Carrie's Scrapyard, but she linked it back to the original creator which you can check out here.  The really great thing about this basket is that you can make it in several sizes.  I started out with the smallest, but will be working my way up the the larger ones!  This one is the perfect size for a little chocolate treat.  I know because there was one in there.  *wipes mouth!*  It was delicious! :)

I just think this the greatest little basket!  I made mine from Certainly Celery and added some Spring-y looking flowers to dress it up!  I sponged all of the edges with CC ink to give it a more textured look.  It is amazing the difference that makes!

I stuffed it with small strips of trimmed and crinkled Very Vanilla paper.

Handles are attached with brads and move up and down to make stuffing the basket with chocolate easier (and easier to get it out!).

Close up of the flower.  I used the Original Blossom Party Big Shot die to make this.  Topped it off with some twine and a button center.  These buttons look like candy to me! LOL

Details:
 Stamps: None...can you believe that?!
Ink: Certainly Celery
Paper: Certainly Celery, Very Vanilla, Blushing Bride, Bashful Blue and So Saffron
Punches and dies: Blossom Party BS die and Corner Rounder
Extras: Button, brads, twine and pop dots 

Ok, I am off to tackle that cleaning!  Hope your day is wonderful!  Personally, I suggest doing something crafty and then going outside to play just as soon as you can! :)  Have a good one!
I will be back soonest with more to share!


Wednesday, March 28, 2012

Just a little reminder and an invitation!


 Just a gentle reminder that Stampin Ups! Sale-A-Bration ends in just three days!!  For every $50.00 that you spend you get to pick a fun freebie from the Sale-A-Bration catalog!  If you spend $150.00 you get 3 freebies +  Hostess benefits + the free tote bag!  Interested...?!  If so, you can go here to do your shopping and can even do it in your jammies!

   Also, I am looking for some special people to join my team!  If you would like to become a demonstrator and get all of your stamping goodies at 20% off or start your own business  now is the perfect time!  The starter kit is on special for only $125.00 and if you join now you will receive a free package of Designer Series paper every month for the rest of 2012!  WooHooo!  You can get more info here or feel free to e mail me with questions or if you would just to to chat! :)

  Ok, now back to your regularly scheduled program!  I will be back later to post something crafty!
                             Have a great day! :)

Tuesday, March 27, 2012

Spring flowers!!

   Hello and happy Tuesday to you!  This is my second post for today, so feel free to scroll down and check out the first one if you would like! :)

   Spring is in the air and the birds are all happily chirping and the flowers are all getting ready to bloom!  I was feeling inspired to make some of my own blooming flowers today so I dug out a fun pattern that I haven't made in ages!  Have you seen the flower pot cards with the removable flowers?  They are so cute!!  Take a look at my blooming spring flowerpot card:

These cards feel so happy to me!  They are a breeze to whip together too!  Looks kind of like spring exploded!  I used the Blossom Party Big Shot die to make the flowers and added button centers.  I tied the flowerpot shut with polka-dotted Melon Mambo ribbon and added the little sentiment on the bottom with pop dots to tie the colors all together.

Here is a close up of the flowers.  Lots of layering going on!

Here is the card with the tag pulled out.  

Tag all by itself! 
 I stamped the sentiment and punched it out with Largest Oval punch to give it some pop.  I think it makes it look more finished this way.

Details:
Stamps: Precious Butterfly
Paper: Chocolate Chip, Blushing Bride, Very Vanilla, Bashful Blue, So Saffron and Always Artichoke
Ink: Chocolate Chip
Punches and Dies: Original Blossom BS die, Blossom punch, Largest Oval and Sweetest Stem Embosslit, Scalloped Border edge punch, Medium Oval punch and Scallop Oval punch
Extras: Melon Mambo ribbon, Pop dots, Buttons and Rhinestones

These are really fun to make!  You can change the color of the pot and make it look more terra cotta and you can 'plant' all sorts of flowers in your pot too! 

I hope you are having a great day! I will be back soonest with more to share!


Twisted Tuesday just got twist-ier!!

   Hello there!!  Guess what?!  I made the Twisted Tuesday Design team!!  Every Tuesday for the next six months I will be sharing the fun twisted challenges with you and showing you my take on them...all Stampin Up! style of course! :)   Hope that you will play along too! I heard a rumor that there might even be some prizes some Tuesdays chosen randomly!!  Head on over to the Twisted Tuesday site here and check things out!  Buckle up and hold on tight...it's going to be a twist-y ride!!

   Here are the blogs of the other Design team members:

                     Melina~Owner
                          Jeanette
                                Kelly
                                     Cindy
                                        Patty

Thanks for stopping by!  I will be back later today with a second crafty post!!  See you soonest! :)

Monday, March 26, 2012

Tiny, little purses!!

Hello!  Happy Monday!  I have the cutest little purses to share with you today!! Stampin Up!  has come out with a new Big Shot die that just totally blew my socks off!!  I am so excited about it because I can see so many possibilities!  It is small, but you should never underestimate the small things!  This cute little guy will hold 5 Hershey's nuggets or several kisses!   You could put all kinds of little things in here!  See:

You can get two purses from one sheet of 8.5 x 11!  You can dress it up any way you would like! 

Change the colors!  Stamp on it!  Use DSP for the flap or the whole purse!  Did I mention that I was EXCITED!!!

This die will be available April 1st from Stampin Up!  I think I might be in love! :)

These would make great little party favors or Easter basket stuffers!  I will be making lots and lots of these little guys!!

Hope you are having a good start to your week! :)

I will be back soonest with more to share!  Have a wonderful day!

Saturday, March 24, 2012

Up, Up and Away!

   Happy weekend!  Have you ever noticed that inspiration is all around you?!  Amazing color combinations and project ideas everywhere you look!  I found myself inspired by a picture I saw recently.  I spent a lot of time staring at this photo and decided that one day I would use it as the inspiration for a project. Today is that day and since it feels like a card kind of day...that is what I decided to make!  Here is the picture that I used as my inspiration and underneath is the card that I made:

Isn't this just the neatest picture?!  I just love it!

Here is my card. I started  with Very Vanilla and created the sky and grassy hills by using torn paper and sponges.  I punched the icing from the 2 step cupcake punch and sponged around it to make clouds.  The sentiment is from Field Flowers.

Popped up some of the hot air balloons with pop dots to make them look closer.  

Details:
Stamps: Field Flowers and Up, Up and Away
Paper: Crumb Cake, Basic Black and Very Vanilla
Ink: Chocolate Chip, Old Olive, Always Artichoke, Pacific Point, Cherry Cobbler, Pumpkin Pie and Orchid Opulence
Punches: Decorative Label
Extras: Pop dots 

This picture makes me want to lay on one of those hills for hours and watch the hot air balloons float over!!  It just begs for an afternoon of day dreaming followed by a picnic!  That sounds like a great weekend plan to me!  Hope your day is filled with wonderful activities!  I will be back soonest with more to share!


Friday, March 23, 2012

Twisted Tuesday!

   Hey there! :)  I have had the good fortune to meet so many wonderful, amazing people through stamping and scrapping!  There is just something really special about craft-y folks! One of my very dear, sweet friends has made the leap to start her own Challenge blog (*Hiya Melina!!*) and I couldn't be any more excited for her!  It is called Twisted Tuesday Challenges and can be found here.   She has posted her first challenge which also happens to be a submission for their new design team.  Once I saw the challenge I just knew I wanted to play along and throw my project into the twisted mix!!!   Here it is:

I made a shadow box card.  It has tons of pastel colors, uses black and when you fold its sides in it is a perfect square!  I love making these little guys!  They go together pretty quickly and the end result always looks so finished and full of love!  They actually do fold flat for mailing too which is an added bonus! 

View from the top shows the shadow box part!  The bird and butterflies and all the tiny little flowers are nestled inside of the box.

Close up of the inside.  The flowers are made using the 3 Pack punch set. They are punched, crinkled, separated, re-crinkled and glued together in the center.

Flowers on the outside are from the Blossom Party Big Shot Die with centers punched from the 1/2" Circle punch.  Half of them are pop dotted up to add even more dimension!

Details:

Stamps: Kindness Matters
Paper: Basic Black, Very Vanilla, Bashful Blue, Blushing Bride, So Saffron, Crumb Cake. Pumpkin Pie and Always Artichoke
Ink: Melon Mambo and  Chocolate Chip
Punches and Dies: Blossom Party BS die, Beautiful Wings Embosslit die, 2 Step Bird punch, flower from 3 Pack punch, 2  1/2" Circle punch 1/2" Circle punch
Extras: Rhinestones, Pearls and Pop Dots

Really fun challenge!  Several very talented ladies have already submitted their Twisted Creations!  Be sure to go and check it out!

Hope you have a wonderful day!  I will be back soonest with more to share! :)


Thursday, March 22, 2012

I miss you!

Hello! :)  Thursday already! Week is flying by!  I have a tiny little card to share with you today.  Ever really miss someone?!  Today I am missing my mom.  *Hiya Mom!*  We spent a lot of time together recently and now she is back home and so I am.  Just so happens though that our homes are on opposite sides of the country.  She is a strong, beautiful lady and I am very lucky to have her.  This little tiny card full of sentiment is for her.

Details:
Stamps: Up, Up and Away and Baby Blossoms
Paper: Bashful Blue, Crumb Cake, Blushing Bride and Whisper White  
Ink: Garden Green, Melon Mambo, Blushing Bride and Chocolate Chip
Punches: Dotted Scallop Ribbon Border, Beautiful Wings Embosslit and Designer Frames EF
Extras: Bashful Blue Ribbon and Rhinestones


Earned the Designer Frames free from Stampin Up! because of Sale-A-Bration.  WooHoo!  Gotta love that!   It comes with this oval shape and a rectangular shape.  I was so excited to see that the large oval punch fits beautifully in the center of the oval frame too!  Score!  Love it when things coordinate!

Love the detail on these frames!  They really add something to the project.

Miss you, Mom!  Big hug! :)
**********************************************

So, on a whole other note...the funniest thing happened last night!  I was tooling around on Facebook, which I do occasionally, and I got a wild hair and messaged each of my four kiddos! LOL  Just a quick little hello!  Now most of you with older kids know that they are permanently attached to the internet in one way or another. Well each of them messaged me back within minutes, but then almost like I had actually 'called and invited them' they all just kind of showed up in my room where hubby and I were already hanging out!  It was too cute!  They all just kinda came in and piled on the bed or in the floor and we all visited and had  a great time!  I snapped a picture (which is terrible and dark and fuzzy, but you get the idea!) I may be biased, but I happen to think my kiddos (and our dog!) are all really wonderful people!  I {Heart} them big! 


Have a great day!  I will be back soonest with more to share!


Wednesday, March 21, 2012

Everything old is new again!

   Hello!  How are you today?!  So, I did it!  I took the plunge and unmounted my Stampin Up! Wheels!  I am thrilled with the results.  I was on the fence for a long time about doing, but I have so many great wheels that never get to see ink because I am wheel challenged and using them just never turns out right for me.  It was such an easy project and I am really excited about how well they are going to work for me now!  Stampin Up! offers ez mount cling foam now, so it was a breeze.  Take a look:
So, first you have to dig out all of your wheels!   

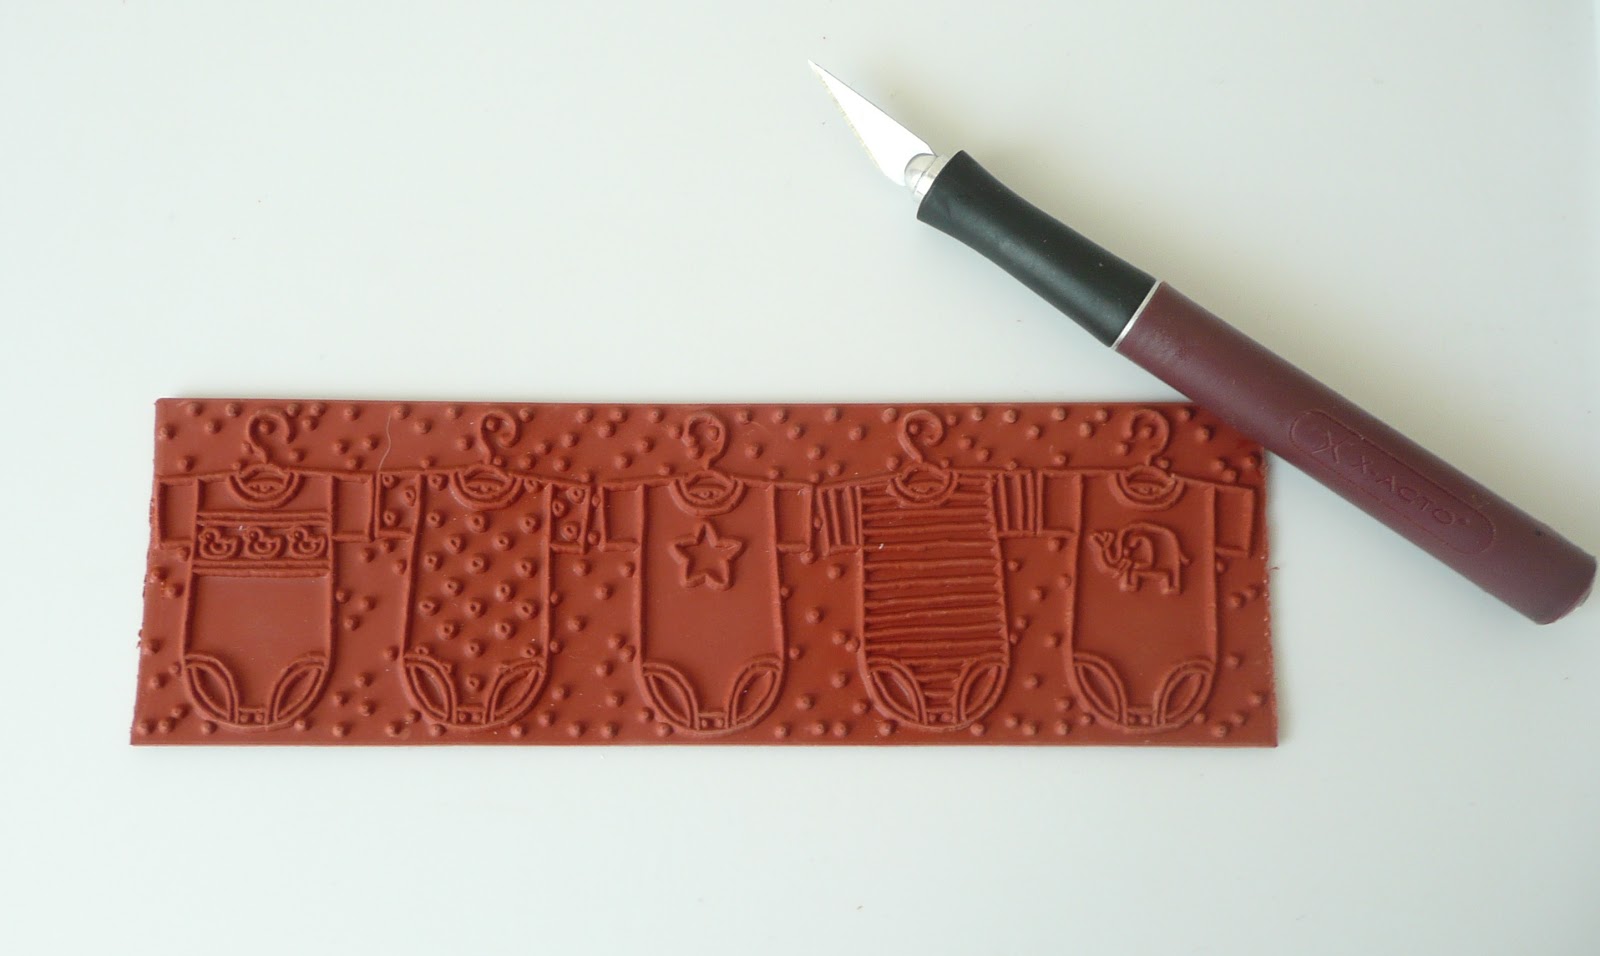
Each piece of rubber is glued onto the plastic wheel and has a seam.  You will need to find the seam and using a sharp exacto knife break the glue seal by running the knife over the seam a few times.  Once you have done that you can very carefully start to pull the rubber from the plastic wheel.

This is what they look like now!  They take up much less room! :)


Here are the leftover wheels!  I gave them to my Science minded kiddo.  I know he will come up with a really cool project for them! ;)

Here are some of them mounted on the ez cling foam.  All you have to do is peel back the protective paper from the foam and lay the rubber on it.  I used my exacto knife to cut along the edge.  Once it is stuck down and cut free you can peel back the other layer of protective paper and it is ready to use!  It will stick to a clear block beautifully just like any of your other clear stamps!

Another very cool advantage to doing this is that they fit nicely inside of the stamp cases.  Each dvd stamp case will hold four large wheels or eight + of the small and builder wheels!  This will be a great space saver!

Here are four in one dvd case.  The case closes fine without any problems! I haven't done it yet, but you could even stamp a cover to show at a glance which wheels are in which cases! Easy peasy!

All of those wheels condensed down so nicely! :)

I wanted to use one right away so I grabbed the cupcake wheel and stamped a border for a scrapbook page! It stamped beautifully!  No missing ink spots!  Nice long, clean stamped image!  Yay!!  Here is the page I made with my 'new' stamp:

It is currently an 8 x 8, but I am going to add it to a 12 x 12 piece of card stock for one of my larger albums.   I used the new stamp as my border and made a birthday banner using the Pennant punch.  It is tied in place to add a little festivity to the page!  The Party This Way sign is from the stamp set Party This Way.  It is one of the free stamp sets you can get during Sale-A-Bration! 

The tag comes out for journaling!  I sponged the edges of everything with Chocolate Chip ink and a sponge dauber to "boy' up the page a little bit since all the cupcakes are kind of frilly looking! These two fellas are my handsome sons!  have I mentioned I am kind of crazy about these guys?!

Up close of the border!  Each cupcake has icing covered in Dazzling Details so they shimmer...yum! Unmounted wheels are going to open all kinds of possibilities!!  My next step of bravery may even include cutting one of them up into pieces to make individual stamps!  Look out I am on a roll now...pardon the pun! 

Hope that you have a wonderful day!  I will be back soonest with more to share! :)