Independent Stampin Up! Demonstrator since 2007
Welcome to my little ole' stamping blog! I'm so glad that you stopped by! I have lots of creative things to share with you with the occasional life post thrown in! Come on in, relax and stay awhile! :)

Saturday, December 3, 2011

Outside looking in!

  Hello!  I have another window card to share with you today!  This one is looking in from the outside.  Yesterday's card was the opposite...looking out from the inside.  You can see yesterday's card here.  I really like the style of this card.

I made house shingles for the roof using the scallop border punch.  I drew in house siding and added snowflakes using my Versamark pad.  Each snowflake has a tiny drop of Dazzling Diamonds in it's center.  I also added DD to the Christmas tree to mimic little lights.  I sponged the outside window edges to give it the fell of a warm glowing fire on the inside using a sponge dauber and Daffodil Delight.

Close up of details.

Sentiment is from Teeny Tiny Wishes...my go to word set!  I layered the Word Window punch over the Modern Label punch and used pop dots to raise it up.    My daughter said this card made her think of Little House on the Prairie! LOL

Enjoy the rest of your weekend!  I will see you soon! 

Friday, December 2, 2011

Through a Christmas window!

   Hello!  I started my Friday morning by taking a wonderful, long walk on the beach.  It was warm enough to be outside with only a light jacket on which made it tough (but not impossible!) to come back in and make a snow filled Christmas card! LOL  My card today is a partial CASE of one of Susan Nygaard's swap cards  that has been floating around!  I just loved the idea of combining these two stamps sets to create a window scene.   This idea lends itself to many outside through the window scenes!

 I changed  the card by using a different sentiment, a plain background and color combo. I colored the sentiment with markers and added mini brads.  I also hand drew the wood grain on the window sill.

Side view of the window!  Love how you can almost feel the cold noses on those kids!  I added Dazzling Diamonds to make the snow glisten in the sun.

Close up of the snow in the tress!  Not sure if you can see the sparkle, but boy is it shimmering!

The two stamp sets are Lovely as a Tree and Welcome Christmas.  I used Chocolate Chip ink to match the window sill and trim and  I sponged the sky in Tempting Turquoise.

Really fun card!!

Have any fun weekend plans?  Hope that your Friday is the beginning of a wonderful weekend for you!
I will see you soonest!

Thursday, December 1, 2011

A little holiday goody!

   Hello there!  Thought I would ease into the whole December thing with a winter themed project rather than breaking out the green, red and gold today! :)  I needed to make a mini gift for someone and thought this would be perfect!  This would be a great stocking stuffer too!  Take a look:

It is a tiny composition notebook!  It would tuck into a bag or purse very nicely to keep your notes in.  I dressed it up for the winter by adding DSP to the front and back and a glitter snowflake.  I monogrammed it for the recipient and added a rhinestone.  I also added a tiny drop of Dazzling Details to every one of those tiny little circles so the whole thing shimmers!  We all know that it is all about the details!


This snowflake is gorgeous!!  I used my Stampin Up! snowflake punch to punch it from the Glitter paper and MUST WARN YOU!!!  If you do this be super careful!  I caught my finger in the punch and left a lovely little blood blister...Yeeee-owwwwch!  I will spare you that photo!   LOL

Matching 3 x 3 card to go with the notebook.

The set!

All packaged up and ready to go! 

This is a really easy project with tons of possibilities!  You could add a matching pen or bookmark to go with it too!  I found the notebooks at the Dollar store (3 for a dollar...scoooore!)  If you make some be sure to email me some pictures!  I would love to see what you come up with!

 Hope you have a wonderful day!  I will back soonest!

Wednesday, November 30, 2011

Woo Hooooo!!!!

   Heeeey there!  I am soooo excited!  Today is November 30th and I did it!! I set a goal for myself to post every single day of this month and somehow I managed to!  Yay!! It is the little things ya know?!  LOL  
  I have a card to share with you today.  It is a simple card, but I kind of liked the way it turned out!  I have wanted to try one of these for a while and today just felt like the day!

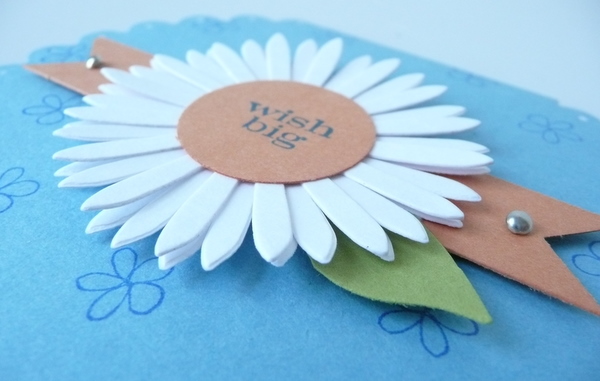
The base is made from the Big Shot Circle die.  I folded my card stock as if it was going to be a normal A2 card and placed the fold line in three scallops from the end so that when it cut it would keep my two sides attached.  That makes it flat along the top.  I stamped the background with a tiny flower from Simply Said (retired...sniffles!) and added little white dots in each of the scallops with a white gel pen.

Side view.

3 layers of daisies cut from the Daisies 2 Big Shot die. Leaf is from the 2 Step Bird punch.

One of my very favorite sentiments!!  Wish Big is wonderful advice for everyone!!

Recipe:
 Stamps: Pennant Parade and Simply Said
Paper: Marina Mist, Whisper White, Pumpkin Pie and Lucky Limeade
Ink: Brilliant Blue
Extras: Mini Brads, Daisies Big Shot die, Large Circle die, 1" Square punch, 1" Circle punch, 2 Step Bird punch White Gel pen  and pop dots

I was going to make one last Fall project, but this is what I wound up with! LOL  I will be putting all of the Fall stamps and papers away for now and will be breaking out all of the Christmas goodies!  Starting tomorrow all of my entries will be Christmas/holiday and winter themed!!  

I hope you are having a nice middle of the week!  I sure am!  I have a fridge full of leftovers from our big dinner yesterday so you know what that means...no cooking for me tonight!!  Yeeeee-haw!   If I am not cooking I am sure to be stamping! LOL 

Have a great day everyone!

Tuesday, November 29, 2011

Thanksgiving again...!

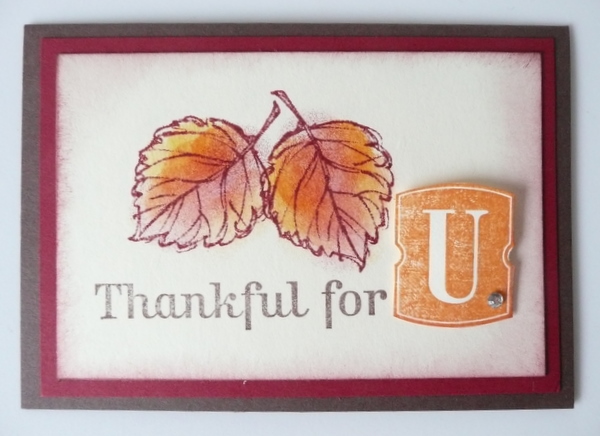
   Hello...and you thought today was just a normal ole Tuesday! LOL  Today happens to be Thanksgiving #3 for us! Sadly, this year we were separated from one of our kiddos on the actual holiday due to a job and so we wanted to have a Thanksgiving celebration that included all of us! Today is that day and we are having the works!  Ham, turkey, green bean casserole, sweet potatoes, baked mac and cheese, cranberry sauce, mashed potatoes, gravy, corn, rolls and of course pumpkin pie! :)   I have been up since the dawn peeked through this morning to get everything in the works.  Definitely a labor of love!  One that I don't mind even a little bit though!  One of hubby's uncles told me once that if you cook for them they will love you! :)  He was a very special guy and those words sure do ring true with me.  I am really looking forward to our dinner tonight.  I really love Thanksgiving and feel really lucky to have my kids all together to celebrate.  I wanted to make little place cards for everybody  to remind them that I am thankful for each of them.

Just a little note with a message tucked inside for everybody! :)

Side view.  The U is raised up on a pop dot.

One, two, three, four, five...

I used sponged daubers to color my leaves and kept the colors all Fall themed.  

Standing side.  These were fun to make! :)


Ok, I need to run!  Time to get the turkey in the oven!  Have a wonderful Tuesday!  I will be back soon! :)

Monday, November 28, 2011

CAS card?!

   Well hey there!  I have a card to share today that I was determined to make as a CAS card!  I recently learned (thanks Melina!) that CAS means clean and simple!  Those have become some of my very favorite kinds of cards.  No frills...just plain ole sentiment and basic picture!  They are, however, surprisingly difficult (for me anyhow!) to create!  Sounds like it would be super easy, but the tiny little voice in my ear (do you have one of those?!) is always whispering to me to add some bling or glitter or a button and another ribbon! LOL   I struggled to try to  keep this one really, really simple, but things just kept piling on!  Does it still count as a CAS when there are 4 1/2 layers and a ribbon!  LOL  You decide:

It is still simple!  Clean lines and no extra stamping!

Just a few layers and some cutting out of the image oh and a tiny, little ribbon and knot!

Layered flowers add pop!  I liiiiike pop!

Ok, so maybe it isn't exactly a CAS card! LOL  It does feel  simple and pretty to me though and that was what I was going for!  I did manage to resist the urge to put some of those gorgeous silver glitter butterflies on it and that wasn't easy!  Hmmmm....maybe my next CAS card will actually be CAS... but probably not! LOL

Have a great Monday!  I will see you soonest!

Sunday, November 27, 2011

Sunday Challenge!

  Happy Sunday everyone!  I have a Sunday challenge card to share with you today.  I have the pleasure of hosting a Sunday weekly challenge starting this very Sunday with my wonderful  blogging group.  I threw down the challenge to them last Sunday to create a card,  a tag, a box, a scrapbook page...anything they wanted for someone they are thankful for.  The only requirement was that they use the color orange somewhere on the project!  Here is my project:

When I sat down to think about who in my life I am thankful for I realized that I have a very long list!  I am fortunate to have so many stellar people in my life. Made me all misty eyed...sniffle, sniffle!  
 I decided to go with a card for this challenge.  My base is Chocolate Chip and my matte is Pumpkin Pie (hello orange!).  I also used Very Vanilla, Cherry Cobbler and Garden Green.

Side view.

Daisies are cut from the Big Shot Die Daisies 2.  I stamped the flower centers with the Grid stamp and stamped a little  leaf all over the background using Versamark. 

 My sentiment is a partial stamp that I only inked half of using a marker.  I used mini brads in each corner.  Those little guys are adorable!

You can check out all of the other challenge artworks  by clicking on the links in my sidebar on the right
(right over there!------------------------->) Under Paper Princess blog group.  They are a seriously talented group of ladies!

Well, I am off to see what sort of trouble I can manage to get into!  Enjoy the rest of your weekend! I will see you soon!

Saturday, November 26, 2011

Friends by choice!

   Hello!  Super quick post today!  We are traveling and need to get on the road, but I wanted to share my latest scrapbook page with you!  I made it using Stampin Ups! My Digital Studio.  It is of my kiddos one day when we were all hanging out together!  We were getting ready to catch a ferry and head out to grab some lunch.  I enjoy playing with the fun features in MDS and it is so easy to use the pages just go right together!


Ok, I am going to hit the road!!  Have a nice Saturday!  See you soonest!


Friday, November 25, 2011

Thank you gift!

  Hello!  How was your Thanksgiving?  Hope it was wonderful!  Ours was and we are lucky enough to be doing it all over again tonight with the other half of the family! :)  I just love Thanksgiving!

   I have a little thank you project to share with you today!  I needed to make a hostess gift and wanted it to be a little different so I pulled out a bunch of punches and got busy!  I started making flowers, and making flowers and making flowers!  I may have in fact gotten a little carried away!  I made quite a few of those little guys!  Take a look:
I needed a container of some sort to hold some thank you chocolate!  

I used the Scallop Circle punch, several other circle punches and the Daisy Big Shot die.

Side view.

Glitter butterfly with thank you sentiment punched with the Jewelry Tag punch.  I added a rhinestone as if the butterfly wasn't shimmery enough!

Flowers close up.

View from the top!
I had a hard time photographing this without the proportions looking off.  Also, I thought it  wound up looking a little like a pair of suspenders, but I knew it would need two handles!  Chocolate goodness is heavy! 

Well, I guess since Thanksgiving is (mostly!) over it is time to start thinking about Christmas!!  Time for sleigh bells and mistletoes!

I am off!  Lots to do before our second Thanksgiving tonight!  Have a wonderful day and I will see you tomorrow!

Thursday, November 24, 2011

Happy Thanksgiving to you!

  Happy Thanksgiving to you!!  Although I feel grateful each and every day for the many wonderful things in my life, it is my tradition to sit and ponder the things that I am especially thankful for on this day! I am thankful for so many things!  I have the four most amazing, beautiful, wonderful children in the whole wide world.  I have an amazing husband.  He is my partner, my friend and my heart.  I have a wonderful family and terrific friends.  I have a warm place to sleep and a full fridge.  I have my health and more importantly the the health of my family.  I am truly very, very fortunate.  I also feel so lucky to have you, my stamping friends.  Thank you for stopping by and visiting me and thank you for your sweet comments.  They mean more than you will ever know.

   Today I am sharing four of the things that I am most thankful for.  Words seem inadequate when trying to describe what these guys mean to me.  They are the reason I do what I do.  I love them very much and I am so proud of them.

My kids. :)


I hope that you have a full and wonderful Thanksgiving.  I hope that you're surrounded by loved ones and that there are lots of chaotic, happy noises and that your meal is yummy!  I hope that you have a super long list of things to be thankful for too!  
See you soon!


Wednesday, November 23, 2011

Is it a card or a box or both?!!

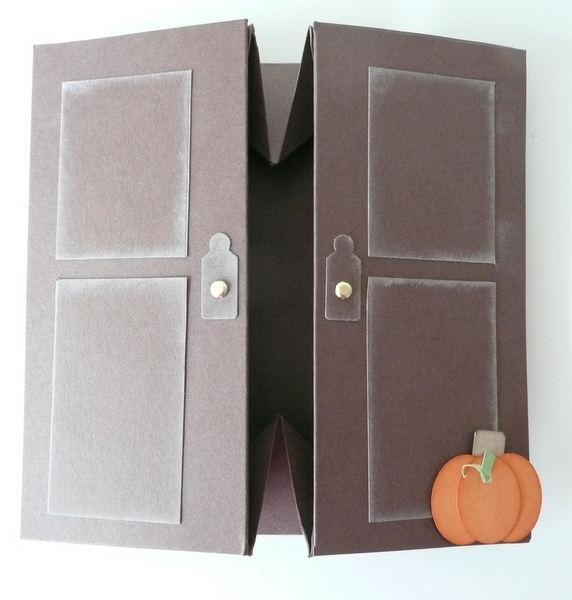
   Hey there!  I have got the neatest project ever to share with you today!!  My upline, upline, upline  (Hiya Coleen!) challenged our demo group to make a project that was shared at a Regional event recently.   I thought it looked cool before I created it, but once I actually sat and made it I was so excited about it!  It is the neatest thing!  It lays flat like a card but opens up into an actual box! How cool is that?!!!  Take a look at this crazy thing:

The example she sent us had cute snowmen on it, but I thought given the design it was just begging to be turned into double doors!  When you are making it you have to cut away the four corners of the paper  so I re-purposed them to be panels.  I sponged the edges with Craft Whisper White ink to make them stand out.  I punched the door  handles from the scraps of the smaller top panels using the jewelry tag punch and added brad door knobs.  

Side view.  Punch art pumpkin with a curly stem to dress up the door.

Without the belly band.  The doors are opening on their own...makes it feel all hospitable and welcoming!

Card and belly band.  I attached the Fall wreath to the band and added some craft ink to the band itself to make it stand out less when it is on the door.

Some goodies inside!  I would have much preferred to put hot chocolate or a packet of spiced apple cider in here, but hubby's green tea will do nicely! :)

Doors open and box extended!!  Whatever goodies you put in here need to be pretty flat so the card will close and the band will fit, but there are still lots of fun choices!

Close up of the band with wreath.  The wreath is from the Warmest Wishes hostess set.  I colored it with Cherry Cobbler, More Mustard and Pumpkin  Pie markers to make it look all Fall-y!

What do you think?  Isn't this the neatest idea!  Giant kudos to whoever brain-stormed this big guy up!  I am going to make a ton of these!!

Ok, time for me to jet!  Literally...we are heading out today for some travel in just a few minutes!  Heading home for the holiday!  If you are traveling today too please be safe!  Have a wonderful day friends!