Independent Stampin Up! Demonstrator since 2007
Welcome to my little ole' stamping blog! I'm so glad that you stopped by! I have lots of creative things to share with you with the occasional life post thrown in! Come on in, relax and stay awhile! :)

Monday, October 31, 2011

Boo!

Happy Halloween!  I know not everyone cares for this holiday, but I happen to really like it!!  I think it is a lot of fun!  Playing dress up and eating candy is a winning combination in my head! LOL   I have a few more little home made treat holders  to share with you!

  I used the Big Shot die Baskets and Blooms to make these little baskets and tucked a little bit of chocolate goodness inside of them.  They went together much easier than I thought they would and were fun to make!  I added the cute little pumpkin from Autumn Harvest to the front of each one and tied a couple little ribbons to the handles.


Double the trouble or in this case...chocolate!

View from the top.

Hope that you and your little ghosts and goblins have a safe and fun holiday!
Happy Halloween!

Be back soonest with more to share!


Sunday, October 30, 2011

Halloween treats!

   Hello! How is your weekend?  Going well, I hope!  I wanted to stop by and share the little treats I made to take to a Halloween party,  These have been floating around all over the internet so sadly I do not know who to give the original credit to.  If it was you or you know please let me know so I can give you credit.  I think they are just too cute and went together pretty quickly!  Take a look:

How cute is that?!  There is a Reece's Cup nestled between those two scalloped circle pumpkin layers!  Each one requires 2 scalloped circles with 4 scallops cut off the bottom, a piece of ribbon for the stem and a few glue dots plus the candy, of course!

Here is the whole pumpkin patch! :)

Peek at the hidden candy!

There is still time to throw some of these cuties together before the big day! ;) They were a lot of fun to make!

Enjoy the rest of your weekend! I will be back soonest with more to share!

Saturday, October 29, 2011

Birthday Love!

   Hey there!  Weekend is in full swing, but I wanted to stop by for a minute and share a card with you!  I made a birthday card for a very dear and special friend recently.  She is one of those people that touches your life in such a positive way that you just feel lucky to know her!  The card is simple, but full of love.

I used one of my very favorite stamp sets and color combos for this card.  I like the soft feel it gave.

Recipe:
Stamps: Field Flowers and BFF
Paper: Very Vanilla, Crumb Cake and Pink Pirouette
Ink: Garden Green, Blushing Bride and Melon Mambo
Extras: Pink Pirouette, Pop Dots and Rhinestones

Side view.
Happy birthday to a wonderful friend.

Hope that you are having a great weekend!  I will be back soonest with more to share. :)

Friday, October 28, 2011

A box to hold it all!

   Happy Friday!!  So I have had scrap booking on the brain lately and in an effort to try to get somewhat organized and together I decided I needed some sort of a system for  my pictures.  I am short on space so I wanted them all in on place and then it occurred to me!!  I still have the box that I got from the Stampin Up! convention!!  It was all un-assembled and just sitting, waiting patiently for me to bring it to life.  It was a plain white box when I started.  I wanted to pretty it up, but keep it simple enough to be able to lug around without wear and tear damaging it.  I decided to use paper other than what came in the kit.  The paper that came with the kit is beautiful, but I wanted something bright and cheerful to inspire me to pull out some pictures and scrap a page or three! I went with Stampin Ups! Raspberry Tart.  It is retired, but oh sooooo pretty!  Here is my box all pretty-ied up and ready to hold all my pictures:

Such pretty colors! I used the chip board piece from the kit and sponged the edges some.  I added the label holder and brads and slipped in a new photos label (rather than the cards label that came in the kit). I left a white border around all of the DSP.

Top matches the label on the front.

An inside peek!

Added matching paper to the photo dividers.  LOVE this paper!! :)

I am excited to be able to re-purpose this box and to get one step closer to being scrap book organized!  Every little bit helps!  

Have any fun weekend plans?  We have a very full weekend planned!!  We are doing some traveling and visiting this weekend!  Gotta love that! 

I will be back soonest with more to share!  Have a wonderful Friday!

Thursday, October 27, 2011

Scrapp-y page!

   Hi there! I have been at it again!  Woo Hoo!!  I am loving being back on the scrap book wagon!  It is just so much fun and feels really good to know I am preserving history for my children.  I spent about 4 hours looking through pictures trying to pick some good ones to get started with and let me tell you...boy oh boy did it bring back a ton of sweet memories!  Gosh!  Where does the time go? I wanted to share my latest page with you.    I thought I would alternate between my four kids until I started getting more organized and together.  Next up will be a page each for each of my boys.  This one though is of my oldest daughter:

It is an 8x8 page and uses Stampin Ups! Raspberry Tart paper.  It is retired, but way too pretty to just let sit collecting dust.  I used Always Artichoke and a ton of little bitty pearls!  I also used a Stampin Up! EF for the AA panel to give the page some texture.  I faux stitched the paper ribbon border and punched all of the flowers with the  itty bitty 3 pack punch flower.  

My kiddo was 13 in this photo (and is 18 now!)!!  Yikes!  That would tattle tale on me just how scrap book behind I am really am!

Faux stitching, embossing and pearl embellished flower punches.

I know it sounds terribly cliche' but I am telling you... hug your babies because man o man do they ever grow up fast!!  

Have a wonderful day!  I will be back soonest with more to share!

Wednesday, October 26, 2011

Love, love, love you!

   Hello!  This week has a very special day in it!  This week my very wonderful hubby and I will be celebrating our 21st wedding anniversary!  We have been married 21 years, but have known each other for almost 30 years!!  We met when he was 13 and I was 12.  We have four amazing children together and have built a wonderful life together.  He truly is my other half.  He keeps me balanced and makes me whole.  He is smart and funny and handsome.  He is a terrific father, partner and friend. I am a super lucky girl. Here is the card that I made him  to commemorate our special day.


Here are a couple photos of hubby and I:


Happy, happy anniversary to my wonderful hubby.  Lots and lots of love from me to you!

Have a wonderful day!  I will be back soonest with more to share.


Tuesday, October 25, 2011

CCMC HOL5 Sketch Challenge

   Hello!  Happy new week!  Hope that your week is off to a great start!  I have another CCMC challenge card to share with you today!  As usual, it was a fun one!  This weeks challenge was a sketch challenge and those are always good to get your creative juices flowing.  Take a look at the sketch:

Pretty cute, huh? :)

Here is my take on this challenge:


I used that cool tree from Season of Friendship and my sentiment is from Field Flowers.  I used a little scrap of Spice cake DSP and all of my colors are fall feeling! I can almost smell the pumpkin pie cooking! :)


Recipe:

Stamps: Season of Friendship and Field Flowers
Paper: Very Vanilla, So Saffron, Pumpkin Pie, Chocolate Chip and Spice Cake DSP
Ink: Daffodil Delight, More Mustard, Cherry Cobbler and Soft Suede
Extras: Pumpkin Pie Ribbon 

Weather is beautiful here!  The crispness of Fall is definitely in the air which made me want to pull out this fun stamp set! Hope that your day is full of beautiful reds, yellows and oranges!  I am off to make a dent in my To Do list!  Have a great one and I will back soonest with more to share!


Friday, October 21, 2011

Coffee anyone?!

   Hey there!  Do you normally start your day with a cup of Joe?! I love, love, love coffee!  Well...I love the thought of coffee!  LOL  It makes me feel grown up to drink it, but I never manage to drink a whole cup and truth be told I think I love to smell it brewing more than I love to drink it! :)

   Recently I saw someone stamp on a coffee filter and so I thought I would try that out, but when I took out my filter I had an entirely different idea, so I ran with it instead! Here is what I did with it:

Not sure what kind of flower this is! LOL I scored a frame around my flower and added some brads to the corners.  I layered Whisper White onto Marina Mist and layered that onto a So Saffron base. My sentiment is from It's Your day and is stamped in Cherry Cobbler.  I hand cut the stem from a scrap of Garden Green.

Close up of the coffee filter flower.

Front angle.

Want to make one?!  Here's how:

Take a coffee filter and flatten it out.


Fold it in half and crease the fold well.

Fold one side in to about the center and then fold the other side over that one to create a triangle shape.


Lift one layer and cut at an angle from outside edge in.  Then cut the second layer a little higher to make the folded flower look like it has layers.  The bottom piece doesn't get cut at all and should be the tallest layer.  The second layer is a little shorter and the third layer is the shortest.  This picture shows where to cut the top layer.

This picture shows both cut lines.  Next you want to sponge the entire filter using two colors.  I used Daffodil Delight for the main color and Pumpkin Pie for the edges.  You can choose any color combo you like, but you should use the lighter color for the flower and the darker  one to highlight the edges.  Fold the edges back into the triangular shape after you have sponged it and use a glue dot to hold it all together. Tie the end with a coordinating ribbon and trim it close the the knot.

To make the center I just cut a small strip and cut into it several times.  I crinkled it all up and then straightened it.  I used glue dots to adhere it in place.

Here is the finished card again:

This is not my usual style of card, but I enjoyed stepping outside of my create box to try this out!   Try one and email me the link!  I would love to see your coffee filter flowers.

Ok, I have oodles to do today! Hope that your Friday is going well and that you have plans for a wonderful weekend.  I will be back soonest with more to share! :)


Thursday, October 20, 2011

Back to the Basics!

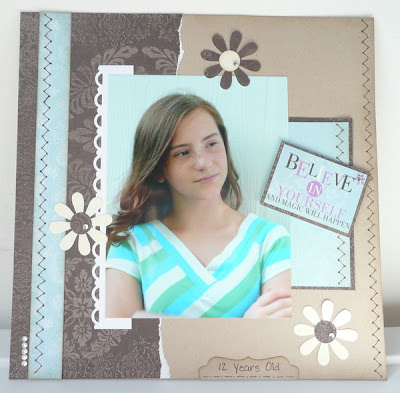
    Hello!  Any scrap bookers out there?!  Me, me, meeeee!  I am a former scrap booking nut!  I used to scrap all the time, but sadly have fallen off the scrap-y band wagon.  It has been a loooong time since I have scrapped anything, but I seem to have been bitten recently by a giant, hairy, nagging scrap book bug! LOL  I have really been itching to get back into it so I have been searching the sites and looking around at all the latest ideas and techniques.  Lots has changed since I last scrapped!  I am feeling pretty excited about starting again though!  I pulled out a few pictures last night and just sat and stared at them.  LOL  It felt kind of intimidating to dive back in so I just sat and stared...and stared..and stared!  Then I went to bed to think on it some more.  After putting together several layouts in my head I finally gathered up enough nerve to get started.  I decided to go with 8x8 pages.  They seemed the most user friendly to me. They are not the giant 12x12 pages, but bigger than the adorable 6x6...more play room!
   Here is the layout I worked on today:

The gorgeous subject of my page is my youngest daughter.  She is such an amazing kid!   I added lots of details to this page.  Everything from torn paper to faux stitching.  I sponged and punched and added bling.  My base is Crumb Cake and the shaped things are all either SU! punches or from Big Shot dies.  My sentiment and colored paper are from a paper pack I have had forever called Blue Raspberry by Deja Vu.

Page 2
  More tearing, sponging and faux stitching!  My pictures all started as 4x6's, but I trimmed them down for visual interest.


Close up of the sentiment.

One of my die cut flowers and the faux stitching.

Both pages together.  

I do remember now why I haven't done more scrap booking! LOL It took me absolutely forever to do these 2 pages!  I worked on them for over three hours!!  Every little thing felt like a huge decision and so I did and re-did and moved this and changed that about a bazillion times!  I must admit though...I loved making these!!  So, now with my new camera and the scrap book bug fever I am gearing up for some serious page making! Wish me luck!! :)

I am off to scrap another page or two! Have a wonderful day!  I will be back soonest with more to share!


Wednesday, October 19, 2011

Pumpkin Treats!

  Helloooooooo! :)  *slides in...whoosh!!*  Sorry to be so late today, but I have had a super full, crazy, busy day!  Wasn't even sure I was going to be able to squeeze in this post so yay!!

   With Halloween being right around the corner my mind has been on all of the goodies and treat potential!  So I whipped up a quick little treat holder and 3 x 3 card to go with it today!  These are really easy to make and 'dress up' a little mini candy bar very well!  You could make these to hand out as your Halloween goodies or they would be really cute to take to a Halloween party!

I used the Top Note to make the actual base or holder.  I scored it about half an inch away from either side of the center and folded it book style.  I made the pumpkin with 5 Scallop Circle punches (Peach Parfait) and half of the Word Window punch (stem).  I scored each of them down the center and glued them all together to make them 3d.  Then I added a couple of rhinestones for some sparkle and adhered the pumpkin on with a pop dot.

Side View.

The goodies on the inside!

I used Peach Parfait to make my base and layered Whisper White onto Basic Black.  I added another 3d pumpkin and some matching bling.

Side view.

Card with treat holder.

Hope that you are having a full and productive day too! :)  I will be back soonest with more to share! Enjoy the rest of your day!