
Hello there! I had the best time last night! I hosted my Christmas Sampler Home Decor class!! There was so much crafty Christmas goodness going on I could barely stand it! There is just something so special about getting together with friends and stamping and hanging out!! Great big thank you to the lovely ladies that attended and if you weren't able to be there, know that we missed you!! Wanted to pop on and share all about it with you guys! Take a look:
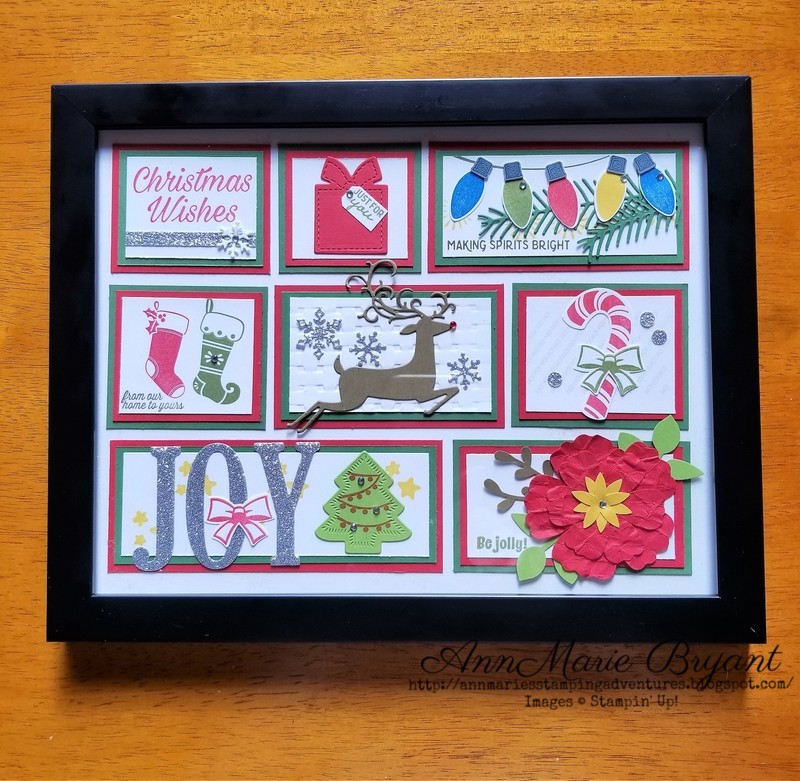
This is the home decor piece that we made! It is an 8.5" x 11" framed Christmas Sampler! I got so tickled! One of the sweet ladies that attended the class said she had no idea what a Sampler even was when she signed up! She really just wanted to come hang out and do some stamping! It got me to thinking that that is really what this all this is about! Friendship and sharing........win, win!
Here are a few close ups of a few of the panels. If you have any questions or would like more info about the ones not shown, zip me an email and I will be happy to dish details with you!

Panel #1

Panel #3

Panel #4

Panel #5

Panel #6

Panel #7
Almost every function that I throw has some sort of silly game! This one was no different!! I made up a silly game, but the rules were too complicated and it was kind of a bust! Oh well! You win some, you lose some (and it was still fun watching everyone play!!). The winner of the game received this banner that I made:

I cut 5 banners and did a little stamping, embossing and embellishing! I think I am going to make one of these for myself too! It just screams Christmas fun to me!!

Each banner measures 4 1/4" x 6 1/4". I cut the banner shape by hand and tied the whole thing together with red and gold Baker's Twine.

I used the Buffalo Check stamp set on the red banner pieces and added some leafy goodness with the Sprig punch. (I love that thing!!) They worked great together!!
I always like to treat my class attendees to a little thank you goodie for hauling themselves all the way out to my house and coming to class! This time they got these:

I made them ornaments in a holder and yummy little treat boxes! Both of which can be reused!

Here they are all pictured together.

Here is the holder. I cut a 5" x 5" square and scored every side at 1/2". I cut 2 flaps on opposite sides and folded on all of the score lines creating the box shape. Before assembling I used a circle from the Layering Circle Framelits to cut out the place the ornament would nestle into. Added the tag and they were done!!

Each little box is made from a 6" x 6" square. I scored at 2" and 4" on one side, rotated and repeated (creating what looks like a scored tic tac toe board). I cut into the score lines on both sides and folded the whole thing into a box shape. Then filled them all with some candy goodness! (These seem to help to keep everyone inspired while we create!!)

I bought oodles of these plain plastic ornaments and gave them new and exciting life! I added a pinch of silver glitter to each one and then filled each one with rolled strips of our beautiful DSP. More details below!

I love them and will definitely be making some of these for my tree this year!

To make these I cut 1/2" x 12" strips of Designer Series paper. Then I cut each of those in half giving me 6" x 1/2" strips to work with. The paper is double sided, so you can roll half one way and the other half the other and get a beautifully coordinated look!

Using the stylus (from my Simply Scored tool) I rolled each one up tighly around the end. Then I gently pulled them off and plopped them (technical term!) into the ornament. Easy, peasy (and very relaxing!!) You could totally make a bunch of these while binge watching your favorite new show on NetFlix!

Fun little tip >>>>> rest your ornament on your scissors to hold it still while you work! When you have it as full as you would like replace the top and tie a bow around it. It is ready for the tree now!!

This is what class prep looks like before folks start rolling in! I pre-cut 95% of everything for my class and pre-package in an attempt to stay organized!

Table is all set and awaiting some stamp happy peeps!

No party is complete without some noshing goodies! These are almost all Christmas themed too! (I sent my wonderful hubby to the store on a mission to bring back some Christmas feeling food and he totally rocked the challenge!!) He is awesome!!

Yummm, yummmm and simply put more yummmm! We also had coffee, tea and soda!

My wonderful class attendees and their projects! They all did an amazing job!!

Here is the Sampler without the glass (and glare!). This was such a fun project! Every single one of you is invited to my next class!

And finally, a fun table decoration to get us all in the mood!
Here is a clickable link to all of the goodies that I used to make these projects! This post is full of info, so as always, if you have any questions zip me an email and I will be happy to answer your questions!
Product List


You should definitely make one of these for your house!! Can't wait to display mine!!
Ok, well in my head, today officially marks the end of the Fall feeling season and it is time to un-November the house and time to December it on up!! I am off to get that process in the works!! When does your tree go up and do your Christmas decorations come out?! Leave me a comment and let me know!
