Independent Stampin Up! Demonstrator since 2007
Welcome to my little ole' stamping blog! I'm so glad that you stopped by! I have lots of creative things to share with you with the occasional life post thrown in! Come on in, relax and stay awhile! :)

Thursday, July 14, 2016

Hope you are feeling special!

Hello, hello!! Hope that this Thursday is treating you well and that you are feeling special! I have a fun little folding card tutorial to share with you today!  This is a stand up, folding card, shadow box combo that is so easy to make you'll want to make tons of them!  Here is one that I have put together:

The really neat thing about this card is that it not only stands up for display, but that it folds up flat to fit into a standard A2 size card envelope for mailing! 

Here are the how to's:

Start with two 4 1/4" x 9 1/2" pieces of card stock of your choice.

Score both at 1", 2", 7 1/2" and 8 1/2".

Using the framelit (or punch!) of your choice cut a hole out of the front of one of your pieces. This becomes your window into the card. You can use any shape that you'd like.  Circles are fun too!

Fold both of your pieces on the score lines creating a "u" shape. 

Now decorate both pieces however you'd like.

Add the adhesive of your choice (I used red line sticky tape!) to the outside panels of the bottom piece.
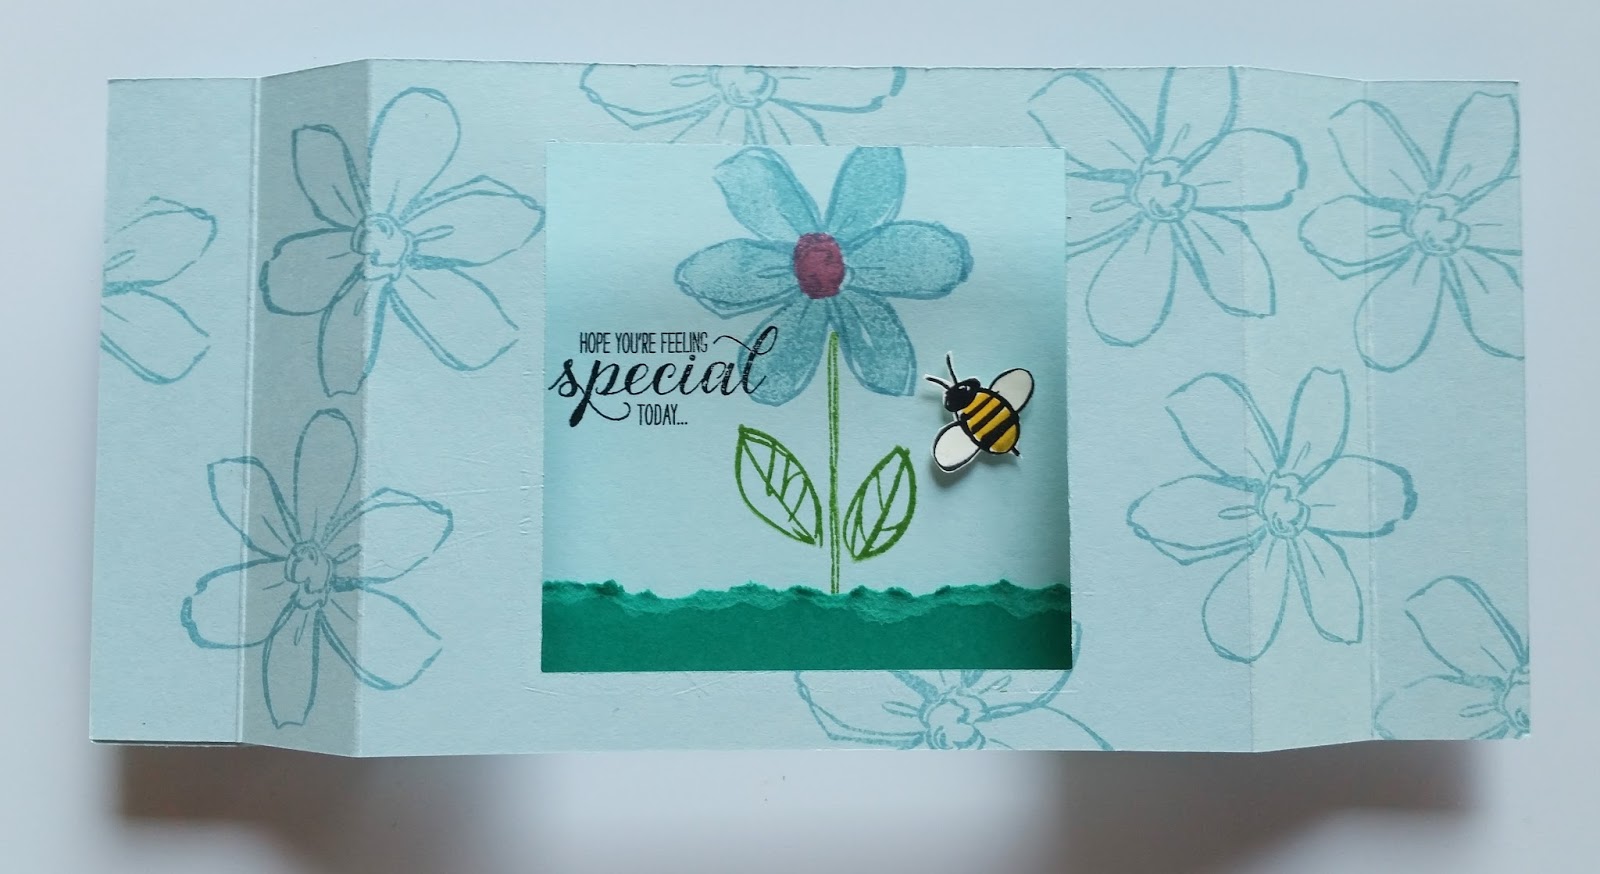
Carefully layer and stick the front to the back taking care to line everything up well.

Add any last minute embellishments to the front.

Your card is ready to be mailed or displayed!  

View from the top.

Such a fun card to make and so many possibilities!

The sides tuck in nicely so it will fit into your envelope.

I think these would be so cute with a photo added to the center!  They would also make cute displays at a shower or even invitations to a party!

Here are the supplies I used to make this one:


If you'd like to make this card and find you need something click on any product above and it will take you straight to my online store!  Happy shopping!

Hope that you have a wonderful day!  I will be back soonest with more to share!


Wednesday, July 13, 2016

It's in the bag!

Hello, hello!  How are you this bright and sunny Wednesday?  I have a fun little card/bag or is it a bag/card idea to share with you today!  I wanted to play with my new Mini Treat Bag framelit and so this is what came from that! Let me start by saying I love that fun little guy!!  What a cute, quick and easy way to make a little gift bag!!  It goes together in absolutely no time at all and the decorating it  up possibilities are endless!! Here is the bag I created:

I used card stock and was a bit concerned it would be too thick, but it did great and made for a sturdier bag!

I stamped it flat before assembling.

Here is the card poking out!

Slides right out so you can add your hand written message!

I added some sequins form the July Paper Pumpkin kit and topped those with Rhinestones to add a bit of fun sparkle.

I stamped the pansy twice and layered it with Dimensionals and added the sparkly center using Silver Glimmer paper.

I am so excited by the possibilities this little treat bag offers!  They would make great party favors or super little thank you gifts or an excellent way to brighten someone's day with a candy bar and sweet note!

Here are the supplies I used to make this little guy:


If you'd like to start making your own treat bags click on anything pictured above and it will take you straight to my store where you can purchase exactly what you need!

I hope that you have a wonderful day!  I will be back soonest so we can visit more! 


Tuesday, July 12, 2016

Welcome back!

Well, hello there! Remember me?! Come on in!  Can I get you a cuppa? Tea, coffee, chocolate milkshake?! :)  In case you wondered what in the world happened to me I'll share a brief explanation! I have been care giving for my 99 year old grandmother for almost (going on 22 months!) the last two years.  I went to her home several states away and spent 16 moths there with her and then 5 months ago hubby and I decided to bring her back here to our home in Virginia.  If you have seen the Beverly Hillbilly's tv show and recall Granny Clampet being gently tied into her rocking chair on the truck and lovingly relocated to a new home (kicking and screaming!) then you can imagine how our move went! She has settled in nicely though and we've all fallen into a manageable routine.  Life can be a funny ride sometimes and sometimes your only option is to buckle up and hold on and go with it!  That is kind of where we are right now.  My husband has been an absolute saint!  I could not be doing this without him.  He is great with her and he and I split shifts and tag team whenever we can. He rocks!!  Here are a couple of pictures of my Gma.  These were taken at Easter.  One of her good buddies sent her this sweet bunny and she just loves it!


Being a full time caregiver is a big job!  It requires 24/7 energy, stamina, patience, compassion and love.  My gma is a tiny little spit fire! Very few dull moments around here.  Ah, the stories I could tell you!  I will save those for another time though. Short story long, (drum roll pleeeeaaaassseee!!!)  I have decided to return to stamping and my fun little business.  Finding the time will be a challenge, but I've really missed it and think it will be both therapeutic and beneficial for me to get back to it.   

So, with all that being said I finally eeked out enough time yesterday to sit and make a card!  I'm a bit rusty, but it felt great to do it!  It is new catalog time at Stampin' Up! which means lots of new colors, stamps and toys to choose from!! So many fun possibilities!!  Here is my card:


I used the Blooms and Wishes stamp set to stamp the back ground.  I stamped off the images on a scrap paper before stamping them on the card. I layered and collaged (technical term!) until I was happy with the background and then moved on to building the card layers.

I stamped and fussy cut the flower and added it with a dimensional to give it a little lift. The strip is just a scrap, so don't ever toss anything before trying it out on a project or two!  The frames are from the Tags and Label framelits set and the sweet hello is from the Hello You thinlets collection.

I added one simple flower to the inside and will stamp the envelope with the same flower to tie the whole project together.


Here are the paper colors I chose for today's card:


Here are the ink colors I used:


Here are the rest of the supplies I used:

Product List


Everything is clickable and linkable!  If you would like to order anyhting you see here just click it and it will take you right to it in my online store!  So, click away! 

 I'm really excited to be back!  Thank you so much for stopping by!  I hope to get things rolling around here and keep them hopping!  

Have a wonderful day and I will see you soon! :)