Independent Stampin Up! Demonstrator since 2007
Welcome to my little ole' stamping blog! I'm so glad that you stopped by! I have lots of creative things to share with you with the occasional life post thrown in! Come on in, relax and stay awhile! :)

Wednesday, September 18, 2013

You make me happy!

Hello there!!  Woke up to another beautiful Fall day today!  Air is crisp and cool!  All of our animals are feeling frisky and playful!  I actually had to dig out long sleeves and a sweater!!  I have about a bazillion things to do today, but I wanted to stop by and have a visit with you guys first!  Want to see the card I made this morning?

This was a really fun one!  Lots of details and neat little layers to keep your eyes busy! I embossed and sponged the background. Inked up and marker colored  the leaf and I did some fussy cutting. I think my favorite part may be the arrows!  I have discovered I have a fondness for arrows!

I used Fall colors and popped up that leaf on Dimensionals.  The border is punched from the Dotted Scallop Ribbon Border punch.

The details:
Stamps: Hello, Lovely and Wonderfall
Paper: Crumb Cake, Pumpkin Pie and Very Vanilla
Ink: Soft Suede, Pumpkin Pie and Cherry Cobbler   
Punches and dies: Dotted Scallop Ribbon Border  and 2 1/2" Circle punch
Extras: Dimensionals

Hope that it is a beautiful Fall day wherever you may be and that you are able to enjoy it to the fullest!  Have a wonderful day! I will be back soonest with more to share! :)


Tuesday, September 17, 2013

Owl Punch Art Book

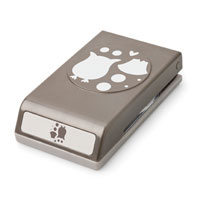
Hello there!  Do you like punch art?  I had the neatest class this weekend and I wanted to share our project with you!  I had a punch art class , but I thought it would be fun to do something a little different.  Normally, I would have several punch art designs in mind and we would make those and add them to our books of punch art.  This time I chose one punch and made it the star of the show!!  I went with the Two Step Owl punch and we made a mini book of punch art concoctions  using this punch as our main ingredient!  Take a look:

This was our finished book. It is held together with a giant jump ring so that we can add lots more mini masterpieces in the future!

 The owl on front is the actual intended outcome form this punch, but just look at all of the other cute things you can make with it:


One of my favorites!!  This sweet cow face is made from the body of the owl!!

We put the other punch pieces on the back so they can be duplicated.  Here are some more:


Turkey...how cute is he?!

Bat!!  Love that little guy!!

Reindeer for Christmas cards, tags or little gifts!

What's up chick?!!!

Booooooooooo!

Roses...I think a dozen of these would be beautiful maybe on a scrapbook page?!!

Fun little mini book! 

The owl punch was used to make everyone of these!  It is really a very versatile punch!!  It is a must have for your punch collection.

#118074

Hope that you are feeling inspired to create some punch art of your own!

Have a great day!  I will be back soonest with more to share!


Monday, September 16, 2013

ABC Challenge time!

Hey and happy  Monday to you!!  Monday's mean two things....time to start a brand new week with lots of new opportunity and ABC Challenge time!!  Today's challenge is to make a Fall card!!  Have I mentioned that I am nutty about Fall?  I just LOVE it, so this one was very easy for me to do!! It just came together. See:

Fall colors, falling fall leaves and pretty, pretty flowers!!  Win, win, win!

Fall is such a wonderful season because the weather is starting to break and the pumpkins are coming out!  There are beautiful colors everywhere and the air just feels cool and exciting!  

The Details: 
Stamps: Every Little Bit (retired) and Oh Hello
Paper: Pumpkin Pie, Cherry Cobbler and Whisper White
Ink: Cherry Cobbler and Pumpkin Pie
Punches and Dies: 1 3/8" Circle, Scallop Circle and Flower Garden EF
Extras: Dimensionals and White Gel pen

Head on over to ABC Challenges and check out the awesome cards the DT came up with!  We would love to have you play along!

Have a super day and I will be back soonest with more to share!


Sunday, September 15, 2013

Christmas card Sunday #37

Hi there!  Time for another Christmas card!  We are up to # 37!!  Wow!  Christmas really will be here before we know it!!  This is the last of the cards we made Friday night at my Christmas card class.  It was my favorite so I save it for today!  Here it is:

I made one as an example for class and then made a second one in class.  I wanted to show the girls that you could use a set that wasn't necessarily a holiday set and turn it into one!  This uses the stem from Simply Sketched.  I made the background with it.

I changed the placement of the sentiment on this one and left off the pearls.  Funny how moving one thing can make the whole card look different! 

We stamped the stem in green and then colored the berries with a red marker before stamping.  We water colored the stems and then added Dazzling details in red to them.  We made a mat for the sentiment by punching a solid red punch, cutting in in half and then adding it to the back. The red strips were left over from another project, but worked perfectly to break up the white space!  ALWAYS save your scraps!! :)

The Details:
Stamps: Tags for You and Simply Sketched (Hostess set)
Paper; Real Red, Garden Green and Very Vanilla
Ink: Certainly Celery,Old Olive and Real Red
Punches and Dies: Label Bracket punch
Extras: Aqua Painter, Dazzling Details (red) and Dimensionals

Have a great day!  I will be back soonest with more to share! :)

Saturday, September 14, 2013

Christmas card class!

Hello!  I had such a great class last night!  Have I mentioned that I have a great group of girls that I stamp with on a pretty regular basis?  Last night I held a Christmas card class and as I explained to my group, when I sat down to decide on the cards we were going to make it suddenly felt like  a lot of pressure!  I think Christmas cards are kind of a personal thing!  We all have our own style of the sort of cards we would like to send.  I wanted the cards to be special, so this is what we went with:

This design has been floating around practically forever, but how cute is it?!!  Couldn't resist making this one!

The big guy all dressed up!

This is a variation of a couple of different cards I have seen.  Recognize that pine stem?  It is from the Lovely as a Tree set!  That set is so dang versatile!!  I really love it!

The ornament is popped up to add a little 3d-ness (technical term) to the card!

I stepped out side of the traditional Christmas color  scheme of red and green with this one!  It was a big hit though, so yay!! 

Silver and blue are very elegant for the holidays!  

Since it was a Christmas card class I wanted their little thank you for coming gifts to be Ho-ho-ho themed!!  Here are the gifts I made them:
Here is one of the red ones!

Filled with some goodies!

One of the green ones!

Here are the two different colors together!  

Quick and easy and fun, fun, fun to make and receive!

I have one more card from the class to share with you, but will save that for tomorrow!  Hope your weekend is off to an awesome start! I will be back soonest with more to share!


Friday, September 13, 2013

Thank you!!

Hello there!  Want to see the thank you cards I made for my stamp club girls this month?  I like to put a little thank you note in their bags with their orders to let them know how much I appreciate them!  This is the card I made for August:

It is a 3 x 3 card.  One of my favorite sizes to make!  

I managed to squoooge (technical term for lots of squeezing into a tiny little space!!) lots of details into this little guy!  The background is embossed with the Chevron EF.  The sentiment is stamped and cut out using a framelit.  The thank you sentiment is stamped on half of a Decorative label punch and the tiny little heart is on a punch popped up with a dimensional!  Phew!  See...lots of details! 

Here are all six of them together!  I have such a great group of ladies that belong to my club! We have fun! 

The details:
Stamps: Perfectly You (Hostess set) and Lots of Thanks
Paper: Night of Navy, Very Vanilla and Pink Pirouette
Ink: Night of Navy
Punches and Dies: Two step Owl, Decorative Label, Hearts a Flutter framelits, Little Labels and Chevron EF
Extras: Dimensionals

I am off to veg a bit before bed!  Been a full day!  I will be back tomorrow to show you what my class made tonight!  


Thursday, September 12, 2013

Hello there!

Hiya!  Stopped by to share a card with you that I made this morning!  It was my second attempt at a card today! LOL  Ever sit down to create and no matter what you do nothing (and  I mean NOTHING!!) seems to come together? I had that sort of morning! I had the cutest idea floating around my head, but it just would not translate to paper.  I tried different colors and different layouts....nope and nope!  I finally scrapped the whole idea and went in a totally different direction.  Here is the card I wound up making instead:

This cool bicycle is from Timeless Talk and the polka dotted paper is from Seasons of Style DSP.

I added Rhinestones to the tire centers and sponged the main image.

The torn corner added to the Timeless feel of the card.  I also ran the background piece through the  Big Shot using the Stripes EF.

The details:
Stamps: Timeless Talk
Paper: Soft Suede, Pistachio Pudding, Very Vanilla and Seasons of Style DSP
Ink: Soft Suede
Punches and Dies: Stripes EF
Extra: Sponges and Dimensionals

Have a super day!  The weekend is almost here!!  Woot Woot!!


Wednesday, September 11, 2013

Match-y match-y!

Hello there! :)  Have you heard that Stampin Up! has a new envelope maker?!!!  I was so excited to get my hands on this thing!  You can make oodles and oodles of personalized envelopes that match your cards!!!  I took it out of the box this morning and literally had an envelope made in about three minutes!!  Take a look:

Here is a little 3x3 card that I made.  I kept it super simple because I was actually more interested in making the envelope today!

Here is the card with it's matching envelope!  No joke....less than 3 minutes to make!

I used double sided patterned paper so the inside of the envelope is as happy as the outside! I used the same paper to make the accent strip on the card so they would be a matching set!

It fits inside beautifully!  The envelope maker really is super simple to use!  You can make over 60 sizes of envelopes.  There is a built in size guide printed on the board.  It comes with it's own score tool and corner rounder!!  I am seriously tempted to just sit and make tons and tons of envelopes today!!   LOL 

The details:
Stamps: Tags for You
Paper: Sahara Sand and Seasons of Style DSP
Ink: Soft Suede
Punches and Dies: None
Extra: Envelope punch board

If you are as excited as I am about this Envelope Punch Board you can hop on over to my website here and order one for your self!  The item number is: 133774. It is $19.95.  There is also a video there to show you the how to's!  Fun, fun stuff! 

Have a great day!  See you tomorrow!


Tuesday, September 10, 2013

Spiderman...spiderman...

.....does whatever a spider can!!  Watch out!! Here's comes a Spiderman!!!  You can thank me later when the Spiderman theme song is still stuck in your head! LOL  I have the cutest card to share with you today!!!  This is NOT my original idea.  This was the make and take we did at my demo meeting this weekend!  Quite honestly, I am not certain who the brilliant creator of this card is, but if it is you please send me a shout out so I can make sure you  get credit!  It is simply amazing!!  (See what I did there?!!  Like the "amazing spiderman"...never mind!!)  I am feeling a bit sleep deprived today! LOL    We have had a couple of very busy days and I am  practically loopy!   Ok, on to the eye candy!  Lookie:

Is this not the cutest punch guy ever?!!!  

Spins a web, any size!!!  Looook out...here comes that spider guy!! Yeah!!  LOL

I hope that you are having a wonderful week!  I am lucky enough to have a dinner date with hubby and some friends tonight so I am off to get ready!  

Have a super day!  I will be back soonest with more to share!


Monday, September 9, 2013

ABC Challenge!

Well hello and happy Monday to you!  Time for another ABC Challenge! Today's challenge is to make a sympathy card.  These are never any fun to make, but sometimes they are necessary.  I always have such a hard time making these kinds of cards.  When you have to make and send one of these it is because someone is hurting and that just breaks my heart.  I always want to send a big hug in the card.

I kept the card very simple.  No bling and muted colors.  It is straight forward and very understated.

I did emboss the background panel with the stripes EF. The semi circle is Soft Suede and the image is stamped in Smoky  Slate.

The details:
Stamps: Fabulous Florets and Teeny Tiny Wishes
Paper: Basic Gray, Pistachio Pudding, Soft Suede and Whisper White
Ink: Smoky Slate and Garden Green
Punches and dies: 2 1/2" Circle punch and Stripes EF
Extras: None

We would  love to have you play along with us!  Be sure to stop by the ABC Challenge blog and check out the cards the Design Team made.

Have a great day!  I will be back soonest!