Hiya!! Four days until Thanksgiving! I am so excited!! I loooove Thanksgiving! It is my absolute favorite holiday of the whole year! I just love the holiday season and Thanksgiving gets everything rolling!! Since we are starting Thanksgiving week I thought I would make another Fall themed project. I went looking for supplies and remembered that I hadn't played with my October Paper Pumpkin yet. As usual, it is a really fun kit. It is a card kit and although the cards that it would make were cute I decided I wanted to go in a different direction with it (what's new, right?!) Take a look:
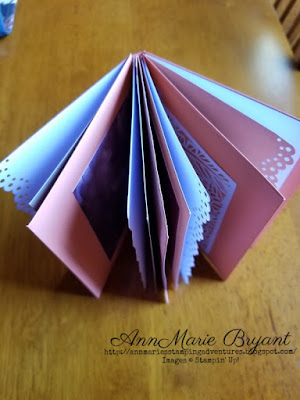
I made a Thanksgiving mini album using all the bits and pieces from the Paper Pumpkin kit!! I basically just started gluing everything together....I used all the envelopes and cards! There were a couple of different sizes, so it offered lots of visual variety for the book! The finished book measures 4 1/2" x 6 1/2" and has 21 places to add photos, souvenirs and little mementos! Fun, fun, fun!! I cannot wait to get my Thanksgiving pictures added to my little book!
After I created the base of the album I dressed up the cover. I used a scrap piece of Soft Suede to cover the raw edge (all the the folds glued one on top of another). I ran it through the Basket Weave Embossing Folder first to give it some texture. Then I added a stamped sentiment from Colorful Seasons and a few die cuts from the coordinating Framelits set.
Here is the album all fanned out to show you how many fun pages it has.
Here is the book closed. I plan to make it good and chunky by adding lots of fun things...pictures and keepsakes etc.
This is the October Paper Pumpkin kit that I started with.
The following pictures will explain how I attached everything:
I started by tucking one of the large cards into the envelope between the opening and the flap. I adhered the flap to the front of the card and this became the cover of my album
This is what pages 3-4 look like. (1 and 2 are the inside of the card).
Next I took one of these smaller 3 part cards and cut off the delicate die cut piece. I saved it and used it on the cover!
Using the leftover 2 part card I glued one side to the back of page 4 and the other side to the front of another card.
This is that card opened up. Lots of room to add memorabilia!
For this set of pages I opened up the envelope and cut off the bottom and both side flaps. The liner is beautiful and I wanted it to show! I glued the outside of the envelope flap to the back of my card for this spread!
Next I did the same with a smaller envelope.
For the next spread I left the envelope in tact and glued the flap to the back of the previous page. Once in place I glued on one of the 3 part cards.
It will open up like this!
For the last page (and back cover of my book I folded the envelope flap in place around the raw edges and glued it to the front cover. I used a hinge that I cut from one of the small envelopes to glue it to the last page.
Here is the completed album base again:
I will come back and post the whole album again once it is all filled up so you can see the finished project! I plan to use lots of the embellishments from the Paper Pumpkin kit to decorate the inside!
If you are interested in My Paper Pumpkin or any of the other items I used today you can check them all out here: (Click on any picture!)
Hope your week is off to a great start! I will be back soonest with lots more to share! Have a wonderful day!


No comments:
Post a Comment