Hello there! How is Thursday treating you?! Well, I hope!! I have been under the silly illusion that today was Wednesday all morning long! I sincerely managed to lose Tuesday somewhere, somehow! LOL Anyhow, did you happen to see the box I made a couple of days ago? Now I don't remember which day it was, but you can check it out here if you would like! I wound up receiving oodles of requests for a tutorial, so I put one together for you today! (Thursday...LOL!!) It is such a quick and easy project, but one of my all time favorite go to's! Take a look:
It is such a great box!! It only uses one sheet of card stock for the base and then you can add as many or as few decorations as you would like to dress it up!
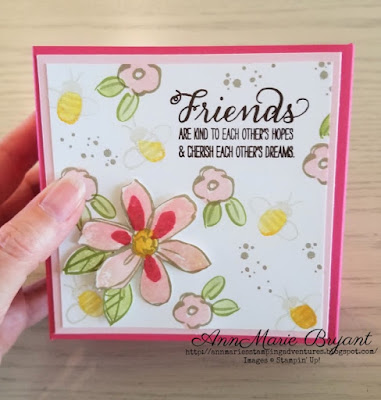
I layered 2 pieces of card stock on the front and stamped it up all happy and Spring like! I used the stamp set Garden in Bloom and did some Two-Step stamping to fill in all of the colors. The large flower is fussy cut and popped up on a dimensional. I filled in some of the white space with a splotch stamp from Timeless Textures. Fun!!!
Here is a view from the top! It is a deep enough box that it will hold lots of chocolate...or you know, anything else you want to stick in there! (Chocolate happens to be my favorite box stuffing thing!)
It will hold several cards and their envelopes and you could even tuck a pen, some stamps and more chocolate in there!
Ok, on to that tutorial:
You will need:
1 sheet of 8 1/2" x 11" sheet of card stock for the box base
1 piece of card stock 4 1/4" x 4 1/4" for your matted layer
1 piece of card stock 4" x 4" for the top layer
+ any embellishments you'd like to add!
Start by scoring @ 4 1/2" and 6 1/2" on the 11" side.
Flip and score @ 2" and 6 1/2" on the 8 1/2" side. You have scored a tic tac toe looking pattern.
On each side carefully cut teeny little "v"s out, but do not cut past the intersecting score line.
It should look like this now! This allows you to fold it up without any extra bulk.
Using Tear and Stick tape (or adhesive of your choice!) add your sticky to the small side flaps and bottom side flap as shown here.
Now (while it is flat!) is a good time to stamp, decorate and adhere your front panel. The measurements for those 2 pieces are listed above. Attach to the top half. Be sure to put it right side up! You can also stamp the whole box before assembling it!
Fold and crease well on all of the score lines and fold into a box. When you assemble the box the small flaps will get sandwiched between the two large flaps. This makes for a neater looking box! That pretty much does it! Now fill that little guy up with all sorts of things!!
*******A fun tip:**********
When I am going to be layering card stock I always punch pieces out of the middle layers and stick them in a little dish on my desk.. It winds up being hidden, but makes use of all of your card stock!
Example!
It gets completely covered up!
Here is my box one more time!
Here are all of the supplies that I used to create the box:
Product List
*********************************
Just a reminder!! Sale-A-Bration is still going on!! For every $50.00 you spend with me you get to pick a freebie!! Click the picture for more details!!
Also, it's a super duper time to join the Stampin' Up! family!! Right now when you sign up you get your $99.00 kit (valued at $125.00) and on top of that you get to choose 2 free additional stamp sets!! I would love to have you on my team!! Feel free to email me with questions or you can click the picture to read all about it yourself!
I am off to get a work out in and enjoy the rest of the day! I cannot thank you enough for stopping by! It is always so nice to visit with you! Leave a comment and say hello! :)
Have a great day!


No comments:
Post a Comment